In a digital world moving at the speed of light, real-time applications are more important than ever. A real-time chat is a perfect example of how we can use technology to communicate instantly, regardless of distance.
In this article, we will explore how to create a simple real-time chat using Node.js, Express and Socket.io, three powerful tools that make developing real-time applications simple and efficient.
Important note: Node.js installation in the development environment is required.
What makes real-time magic possible? Socket.io
The beating heart of any real-time application is its ability to handle bidirectional and non-blocking communications between client and server. This is where Socket.io comes into play, a JavaScript library for real-time web applications. Socket.io is composed of two parts: the first on the server side that runs on Node.js, the second is a client library that runs in the browser. This structure enables smooth and real-time communication.
Building a real-time chat
Project setup: Create a new folder and use the npm init -y command to initialize your new project. Inside your folder, the package.json file will appear with default settings. Then install express and socket.io:
npm init -y
npm install express socket.ioServer Setup: Inside your folder, create a server.js file and set up a basic HTTP server with Express, starting Socket.io listening on the same server.
// server.js

const express = require('express');
const http = require('http');
const socketIo = require('socket.io');

const app = express();
const server = http.createServer(app);
const io = socketIo(server);

app.get('/', (req, res) => {
  res.sendFile(__dirname + '/index.html');
});

let userCount = 0; // Counter to assign a number to each user

io.on('connection', (socket) => {
  userCount++;
  let userName = `User ${userCount}`;
  console.log(`${userName} connected`);

  // Send the new user their unique identifier
  socket.emit('userId', userName);

  socket.broadcast.emit('message', `${userName} connected`);

  socket.on('message', (msg) => {
    io.emit('message', `${userName}: ${msg}`);
  });

  socket.on('disconnect', () => {
    console.log(`${userName} disconnected`);
    io.emit('message', `${userName} disconnected`);
  });
});

const PORT = 3000;
server.listen(PORT, () => {
  console.log(`Server listening on port ${PORT}`);
});
The code just displayed sets up a simple HTTP server that serves an HTML page at the main URL. It uses Socket.io to open a WebSocket connection, listening for connection events, receiving chat messages, and user disconnections.
When a user connects to the server, a counter is incremented that assigns a unique number to each user, and a corresponding username is generated.
The server then sends the unique identifier of the newly connected user to the client. Additionally, the server sends a broadcast message to other users to notify them of the new connection.
Users can send messages through the chat, which are transmitted to all other connected users. When a user disconnects, the server sends a notification message to other users.
Creating the user interface: Next, create an index.html file with a simple interface for your chat. Use JavaScript to connect to Socket.io on the server and to send/receive messages.
// index.html

<!DOCTYPE html>
<html lang="en">
<head>
  <meta charset="UTF-8">
  <title>artCode - Real-time Chat</title>
  <style>
    body { font-family: Arial, sans-serif; }
    ul { list-style-type: none; margin: 0; padding: 0; }
    li { padding: 8px; margin-bottom: 2px; background-color: #f3f3f3; }
  </style>
</head>
<body>
  <ul id="messages"></ul>
  <p id="user-id"></p> <!-- Element to display user ID -->

  <form id="form" action="">
    <input id="input" autocomplete="off" /><button>Send</button>
  </form>

  <script src="/socket.io/socket.io.js"></script>
  <script>
    var socket = io();

    socket.on('userId', function(id) {
      document.getElementById('user-id').textContent = 'Your ID: ' + id;
    });

    var form = document.getElementById('form');
    var input = document.getElementById('input');

    form.addEventListener('submit', function(e) {
      e.preventDefault();
      if (input.value) {
        socket.emit('message', input.value);
        input.value = '';
      }
    });

    socket.on('message', function(msg) {
      var item = document.createElement('li');
      item.textContent = msg;
      document.getElementById('messages').appendChild(item);
      window.scrollTo(0, document.body.scrollHeight);
    });
  </script>
</body>
</html>Inside our index.html, in addition to including the various HTML tags that will be used for rendering our messages and our input field with which we will manage sending our messages, we find the JavaScript logic for event handling.
We can see how the socket object is created which represents the WebSocket connection with the server. When the server emits a "userId" event, the client automatically updates, assigning the correct userId received from the server.
Furthermore, when the server sends a message through the event with id "message", the client will create a new HTML list element (li tag in this case) containing the sent/received message.
The code also includes the scrolling effect through the JavaScript function related to the window "scrollTo", keeping the focus on anchoring to the bottom of the page and therefore to the most recent messages.
Important to note how the server is listening on port 3000.
Once you have finished creating the two test files, initialized the project and installed the dependencies, let's not forget to launch the command:
node server.js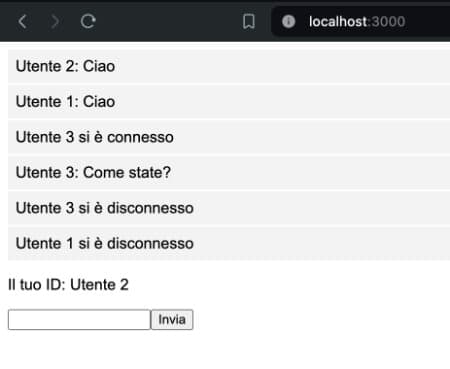
Creating a real-time chat with Node.js and Socket.io demonstrates the power of bidirectional communication in modern web applications. Using Socket.io directly from your server simplifies integration and ensures that client and server are always compatible, allowing you to focus on application logic rather than dependency management. With these foundations, the world of real-time applications is within everyone's reach.