
React Native is an excellent choice for developers who want to build native mobile applications using JavaScript. Using Expo, you can simplify the development and deployment process.
In this article, we will build a simple app with two navigation screens using React Native in combination with Expo, which facilitates project generation and distribution.
The project will be based on TypeScript and we will use Tailwind with the support of the NativeWind library to leverage its advanced styling features even on mobile applications!
Environment preparation
Installing Node.js and npm - Make sure you have Node.js and npm installed. You can download them from nodejs.org.
We can use two installers to create the base project for our app in this case:
- Expo CLI
- npx create-expo-app command
// Expo-cli alternative

npm install -g expo-cli
expo init ProjectNameWe will proceed with the npx create-expo-app command which facilitates the installation. We will add "--template expo-template-blank-typescript" to ensure Typescript support within our project.
npx create-expo-app ProjectName --template expo-template-blank-typescript
cd ProjectNameOnce the npx command is launched and after navigating to the correct directory, we proceed by installing the necessary dependencies.
Installing React Native navigation dependencies (React Navigation)
npm install @react-navigation/native @react-navigation/native-stack react-native-screens react-native-safe-area-contextInstalling NativeWind (Tailwind)
npm install nativewindIt will be essential to configure Babel with support for the NativeWind plugin.
// babel.config.js

module.exports = function(api) {
  api.cache(true);
  return {
    presets: ['babel-preset-expo'],
    plugins: [['nativewind/babel', { mode: 'compileOnly' }]],
  };
};
Once these steps are completed, we can proceed with creating the structure of our project.
Project Structure
Let's organize the code into distinct files:
- App.tsx: Entry point that configures the navigator.
- src/navigation/stack-navigator.tsx: Manages navigation between screens.
- src/screens/home-screen.tsx and src/screens/detail-artcode-screen.tsx: Define the app screens.
// src/screens/home-screen.tsx

import { View, Text, TouchableOpacity } from 'react-native';
import { useNavigation } from '@react-navigation/native';

import { withExpoSnack } from 'nativewind';
import { styled } from 'nativewind';

/* We use styled from NativeWind to create styled versions of native components.
This method converts Tailwind classes into React Native styles. */
const StyledView = styled(View)
const StyledText = styled(Text)
const StyledTouchableOpacity = styled(TouchableOpacity)

export const HomeScreen = () => {

  // useNavigation from @react-navigation/native allows you to manage navigation between screens
  const navigation = useNavigation();

  return (
    <StyledView className="p-4 items-center justify-center flex-1">
      {/* StyledView is the main container that uses Tailwind classes for padding and alignment. */}

      <StyledText className="text-xl">Welcome to the Home</StyledText>
      <StyledText className="text-m">artCode welcomes you!</StyledText>

      {/* StyledTouchableOpacity acts as a button with defined style and uses the OnPress function for navigation */}
      <StyledTouchableOpacity
        className="bg-blue-500 hover:bg-blue-700 py-2 px-4 rounded-lg shadow-lg border border-blue-700 mt-4"
        onPress={() => navigation.navigate("Details")}
      >
        <StyledText className="text-white text-lg">Go to Detail Page</StyledText>
      </StyledTouchableOpacity>
    </StyledView>
  );
}

// withExpoSnack is a HOC (Higher Order Component) from NativeWind that ensures the application works correctly in Expo Snack.
export default withExpoSnack(HomeScreen);// src/screens/detail-artcode-screen.tsx
import { View, Text } from 'react-native';
import { withExpoSnack } from 'nativewind';
import { styled } from 'nativewind';
const StyledView = styled(View)
const StyledText = styled(Text)
export const DetailArtCodeScreen = () => {
return (
<StyledView className="p-4 items-center justify-center flex-1">
<StyledText className="text-xl">Hello from artCode</StyledText>
<StyledText className="text-m">Detail page!</StyledText>
</StyledView>
);
}
export default withExpoSnack(DetailArtCodeScreen);// src/navigation/stack-navigator.tsx
import { createNativeStackNavigator } from '@react-navigation/native-stack';
// Screens
import { HomeScreen } from '../screens/home-screen';
import { DetailArtCodeScreen } from '../screens/detail-artcode-screen';
const Stack = createNativeStackNavigator();
export const StackNavigator = () => {
return (
<Stack.Navigator initialRouteName="Home">
<Stack.Screen name="Home" component={HomeScreen} />
<Stack.Screen name="Details" component={DetailArtCodeScreen} />
</Stack.Navigator>
);
}
export default StackNavigator;
Finally, we proceed with configuring the App.tsx file in our project.
// App.tsx

import React from 'react';
import { NavigationContainer } from '@react-navigation/native';
import StackNavigator from './src/navigation/stack-navigator';

export default function App() {
  return (
    <NavigationContainer>
      <StackNavigator />
    </NavigationContainer>
  );
}
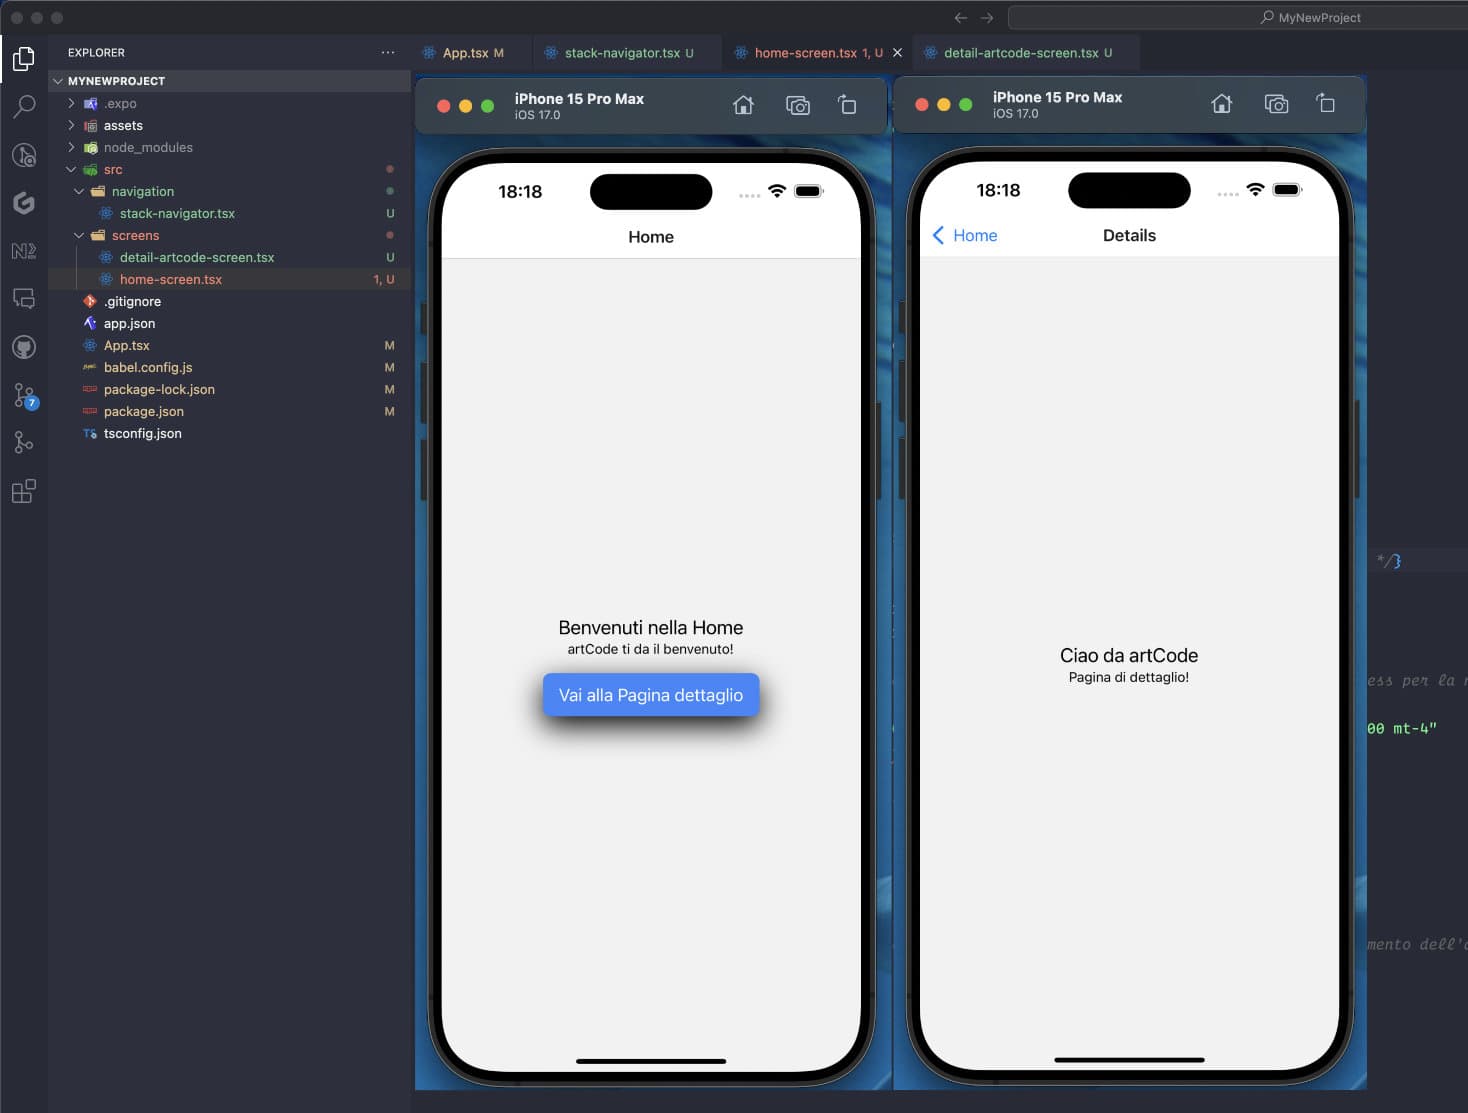
Once you have configured the components in your project, here's how you can proceed through the use of emulators like Xcode/iOS:
Starting the application
npm start / npm run ios / npm run androidOnce the app is started, you will find yourself on a screen very similar to the following (Home Screen). Also, by clicking the "StyledTouchableOpacity" button, when the function is triggered on onPress, navigation to the details screen will occur!
Through this guide, we have explored how to configure a React Native application with Expo and NativeWind, elegantly integrating Tailwind CSS. This tool offers a wide range of possibilities to customize and optimize the user interface. Think about the applications you can develop and the problems you can solve.
React Native, through Expo and NativeWind, have certainly made mobile application development more accessible and less complex. With these tools, you can easily bring your creative ideas to life.
What about you? Which new features would you like to explore?